Because I work for a state agency, I had a three day weekend for MLK Day. Heading into the weekend, I decided that it would be the perfect time to get a project done that I’ve been thinking about for a while.
The Project: Painting an Accent Wall in our Bedroom
I dislike white walls. They’re boring, and industrial-looking, and boring. I’ve had no choice about white walls in any of the other places I’ve lived, because there were specific clauses in our lease agreements stipulating that we were not to paint our walls. Boo.
But now, for the first time in either of our lives, Ben and I own the place we are living. This has its downsides—we’re on the hook for any necessary repairs/maintenance; but, it also has its upsides—we can change things in our apartment, like the color of our walls. Yay!
The Inspiration: BBC’s Sherlock
Wanting to paint the walls of our condo and actually deciding what color to paint them has been the biggest hold-up on this project.
But the other day, Ben and I were watching the BBC’s (amazing) 21st-Century update of Sherlock Holmes (Sherlock), and one of sets caught my eye. The walls were painted cobalt blue and the trim was painted white. The contrast was immensely appealing, and I decided that was what I wanted to do.
I conferred with Ben and he agreed that cobalt with white trim would be an excellent color scheme for at least one wall of our bedroom. I bought paint samples the next day and painted a swatch of my top two colors on the wall, to see which we liked better.
Budgeting for the Project: A Crucial Step
The first step was to figure out our budget. Knowing that we’d be starting from scratch on both the materials (paint, primer, etc.) as well as tools (brushes, rollers, tape), I knew we’d have to budget more than usual. On the other hand, I knew that if we bought good quality items, they would last us through many painting projects down the road.
Paint: The one wall we wanted to paint the accent color is 10′-8″ wide by 6′-8″ tall. That’s 71.1 square feet, which means we’ll a little more than half a gallon for three coats of paint. (One gallon of paint generally covers 300-400 square feet, and dark colors almost always require three coats.) 1 gallon costs between $25 and $35.
Primer: Not using some sort of primer is one of the biggest mistakes novice painters make. Proper preparation of the paint surface leads to a longer-lasting paint job. By my calculations, we’ll need about a half gallon of primer. 2 quarts of Kilz Premium costs $20.
Cut-in brush: I already own this (cost: $10, because I bought a good quality brush that would last a long time).
Roller covers and roller arm: Depending on quality, rollers can run anywhere from $4 – $10 each. Roller arms don’t cost much at the low end ($2?), but you can get extending arms, etc., that cost a lot more (up to $15). 2 decent roller covers should be $6 each, and a non-flimsy roller arm is probably $10.
Tape: Painters tape is crazy expensive for what it is. A roll of 1″ usually costs at least $5.
Drop cloths: You can go crazy and buy really nice cloth drop cloths, or heavy duty plastic tarps. For my purposes, I’m thinking a 2-3 millimeter plastic drop cloth should be just perfect. Probably $8?
Total estimated cost: $90
Implementing the Plan: Buying Materials and Starting to Paint
Having transferred the money for this project from our savings account to our checking account, I went to The Home Depot on Saturday morning to get the materials and tools I would need to paint our wall blue.
Buying Materials
It turns out the Behr now offers a “paint-and-primer-in-one” product. I’m usually dubious about products that claim to do many things well, but since I had such a small area to cover, I figured why not save $13 and just buy one can of paint. (The all-in-one Behr paint costs around $7 more than “regular” paint, but removes the $20 cost of primer from my tally.)
Everything else I bought was right around what I thought it would be, which means I came in under budget. Always awesome.
Final costs:
Paint/primer: $31.28
Painters tape: $5.87
Drop cloth (4’x10′): $3.82
Roller arm (extending, came with roller cover): $9.87
Microfiber roller cover: $4.87
(Paint samples: $6.26)
Total cost: $61.97
Painting
I started painting Saturday afternoon.
I taped the trim and made sure the wall wasn’t too grimy or in need of repair (Preparation is the secret to a good paint job). Cut in around the edges, and rolled on the first coat.
The thing I didn’t know about darker paint colors: you have to wait longer between coats. Usual wait time is 3-4 hours, for darker paint colors, 5-6 is better. We ended up having to get to bed before it would be time to paint the next coat.
I wasn’t able to put the second coat on until well into Sunday afternoon, and I was hoping that two coats would do it, but no dice. The edging, which almost always goes on thicker, only needed two coats, but the main wall area definitely was patchy enough in places to need three.
Fortunately I had Monday off, and the finished product looks pretty awesome, if I do say so myself.
The Finished Product
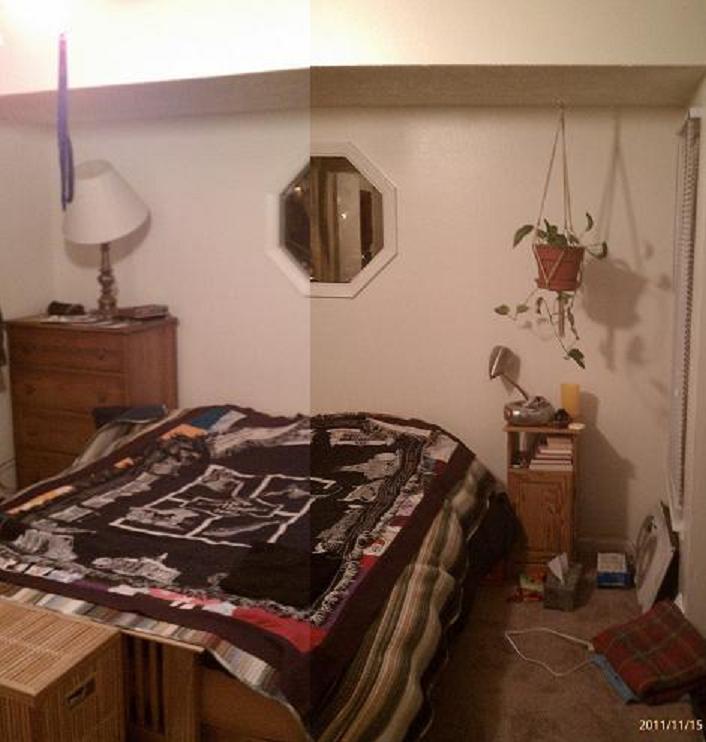
Before:
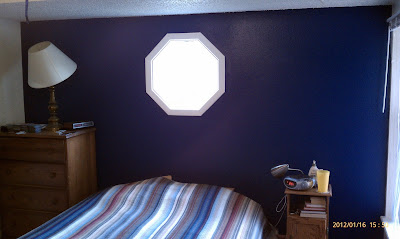
After:
Note: I did not buy any white paint for the other walls, the ceiling, or trim. Before he sold us our condo, the seller had re-painted all of the rooms. So long as I was careful not to mess up, I knew I would only need blue paint.
Eventually, we will repaint the walls, ceiling, and trim in our bedroom, but that’s a project for another day.


{ 1 trackback }