The Project: Adding a shelf in the Kitchen
The kitchen in our condo is basically a galley.


Our kitchen in two pictures. The space between the counters is maybe 4.5′.
Two people can work together in it (an improvement over our last apartment’s kitchen), but they have to be working on opposite sides. Elbow to elbow will just end up getting someone hurt.
The thing this kitchen lacks, like our last kitchen, is storage space. In a perfect world, I would install another set of cabinets above the pass-through…

The pass-through
… but the top of that opening is a heating duct. Without being able to afix them to the wall, cabinets are a no-go.
The Inspiration: Lack of storage space
Since we can’t do extra cabinets in the kitchen, but we still need more storage space, the next best thing is a shelf.
And truth be told, what really inspired the shelf is that I have these great under-cabinet wine glass racks that took me almost nine months to find and our new kitchen cabinets are too close to the counters for me to put them anywhere. I needed another surface in the kitchen under which to install my wine glass racks.
It took me several weeks, and quite a few conversations with my dad and step-dad, to figure out the best plan for the shelf, but eventually I came up with a design that would span the 54″ distance without bowing.
The Plan
The width we had to span was, as I said, 54″, which is pretty far to expect any piece of board to go.
We had to come up with a way to support the shelf along the horizontal axis, so it wouldn’t bow. We also had to figure out some way to anchor the shelf, since I didn’t want to tie the shelf to the cabinet any more than I had to.
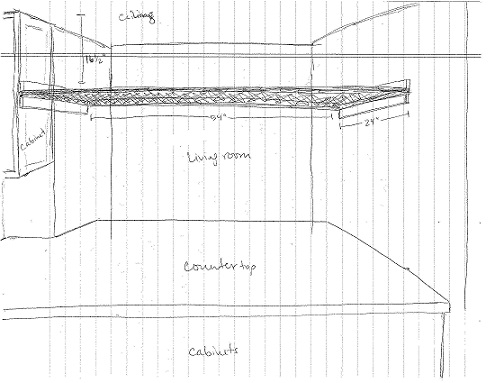
This is what we came up with:
 Because the kitchen cabinet on the left side is almost 12″ deep, and I didn’t want to anchor the shelf only to that, I decide to double the depth of the shelf from the original 12″ to 24″.
Doing that allowed me to attach the bracket boards to two places on the pass-through wall and only one place on the cabinet.
I placed another board above the shelf, parallel to the bottom bracket board as additional support for the shelf on the cabinet side.
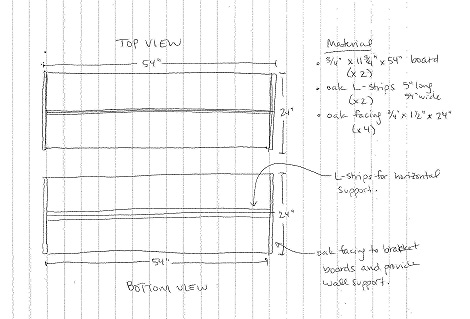
And this is the top/bottom view:

Budgeting for the Project
Materials:
- Oak laminate shelving – 2 @ 11-3/4″ x 1/2″ x 54″, $15 each (8′ lengths)
- Oak trim facing (for brackets) – 4 @ 3/4″ x 1-1/2″ x 24″, $3 / linear foot
- Oak trim L-strips (for horizontal support) – 2 @ 54″, $0.50 / linear foot
- Polyurethane (to seal the oak trim) – small container, $6
- 1/2″ Finish nails, $3 / box
Implementing the Plan: Buying Materials
On Friday evening I went to Home Depot to get the materials I need for this project.
Happily, my pricing was about right, but I was pleased to find heavier duty oak laminate shelving in 3/4″ ($18 / board), which should hold up better.
I also decided also to get a hacksaw ($8 with mitre box), just in case I need to make any adjustments to my trim pieces after leaving the store.
The guys at Home Depot were very helpful and cut my shelf boards to exactly 53-3/4″ despite the many signs saying “no precision cuts.” I was very appreciative, and vowed, yet again, that I will someday have a garage with my own power tools. Projects like this would be so much easier.
Total spent: $70
Implementing the Plan: Installing the shelf
On Saturday I coated the oak trim pieces in polyurethane, which took about 2 hours with all of the necessary drying. I did two coats.
While those pieces were drying, I re-measured the pass-through. I marked on the wall where I was going to place the supporting brackets and determined with my stud finder whether I was going to use drywall screws or wall anchors to hang the shelves. It turned out to be a combination of both.
When the brackets were dry I screwed them into place, and that’s where I hit my first snag.
The Snag
It turns out that the walls of the pass-through are bowed inward. In the middle, of the pass-through, it’s a whole 1/2″ narrower than it is out toward the living room or in toward the kitchen. I was careful to measure the 54″ on both the living room side and the kitchen side to make sure it was the same (it is), but I didn’t think to measure the middle point to make sure it was the same as the outer edges.
This is a problem for the brackets because they are straight, unlike the wall, and therefore don’t sit flush against the wall.
This is also a problem for the shelf boards, which are cut straight at 53-3/4″ inches (as you do).  If I had a compound miter chop saw this would be no issue, but I don’t.
I was frustrated enough by this snag that I decided to stop working on the project for the day and try again on Sunday.
The Solution
On Sunday, with fresh optimism that everything would work out, I re-tackled the shelf project.
To put the brackets in place, I used slightly longer screws and left a 3/8″ gap between the wall and the end of the brackets on either side. It’s not perfect, and someday it will bother me enough to take the shelf down and re-install it properly, but for now, it’s exactly right.
For the shelf boards… well, let’s just say it’s a good thing I bought that hack saw, although manually sawing 1/2″ to 1/4″ off of a 11-3/4″ x 3/4″ piece of particle board is neither fun nor easy. Nor quick.
Eventually, after most of the day on Sunday and part of the evening on Monday, I got the shelf boards to fit, and was able to finish the project.
In the end, when I was done “fixing” the shelves and I had installed the upper brackets, I was doubly glad that I had thought of the “upper bracket” design feature, because it hid most of the hacking I had done to make the shelves fit the rather curved walls of the pass-through.
On Tuesday evening, I hung our under-cabinet wine glass racks and finally put away our various liquor bottles.
I also plan to put hooks (on the living room side) for tea mugs, since we drink a lot of tea and that’s where the electric kettle ended up, but the spacing on those hooks is always complicated, so maybe I’ll wait until next weekend to try that.
The Finished Product
Before:

After:

What’s Next?
I’m not sure we’re going to be able to tackle another project any time soon, because most of our money is going toward traveling to visit family and going back to school. But, if we do have some free time an an extra $75-$100 come our way, the next project is to paint an accent wall in the living room. Not sure what color yet (brick red, to match the fireplace on the opposite wall?), but we’ll figure it out.